Allow External Users to Book Meeting Rooms in Microsoft 365
There are times when you may have a consultant company running a project for your organization and that external partner or vendor may need the ability to view the internal associates’ calendar free/busy information to schedule team meetings. In such scenarios, enabling external users to book meeting rooms fosters a more inclusive and flexible collaborative environment. It facilitates seamless interactions between internal teams and external contributors to streamline partnership contributions.
Below are the steps to allow external users to book meeting rooms in Microsoft 365.
1. Configure External Sharing of Calendars
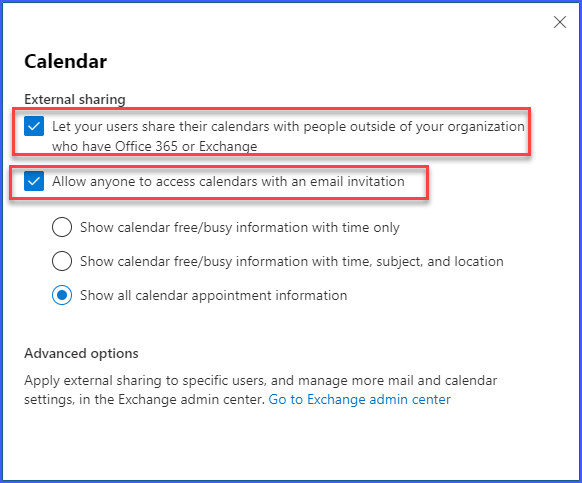
The first thing you need to do is allow External Sharing of your calendars in M365. Navigate to the M365 Admin Center, go to settings, org settings, calendar. The important checkbox is the first one to “Let your users share their calendars with people outside of your organization”. The second checkbox can be any of the three options below based on your internal policies.

2. Identify the Room Resources
Next, you need to list all the rooms in your organization so that you can select which ones to share with external users. Use the following PowerShell cmdlet.
You must connect to Exchange Online as an Exchange Administrator.
Connect-ExchangeOnline -UserPrincipalName jane.doe@contso.comOnce you are connected to Exchange Online, then use the following cmdlet to list all your Room Resources. Note the UPN of each room.
Get-Mailbox -ResultSize Unlimited -Filter {RecipientTypeDetails -eq "RoomMailbox"} | Select UserPrincipalName, Name

3. Enable Calendar Processing for External Users
Now that you have identified the rooms, you must enable each room to allow calendar processing for external users. Use the following PowerShell cmdlet.
Set-CalendarProcessing -Identity <RoomMailboxUPN> -ProcessExternalMeetingMessages $true4. Secure Domains Allowed to Book Meetings
This next step is very important. After you run the Set-CalendarProcessing cmdlet for each room resource (Step 3), you are opening up the calendar for that room to ANY external user on the internet. This means that if someone knows the UPN of the room, they can book meetings by just including the UPN in the meeting invite. Hence the reason for securing the rooms by creating a
transport rule using the “New-TransportRule” cmdlet in the Exchange Online PowerShell module to prevent the booking of rooms from anonymous domains.
New-TransportRule -Name <TransportRuleName> -SentTo <RoomMailBoxUPN(s)> -MessageTypeMatches "Calendaring" -FromScope "NotInOrganization" -RejectMessageEnhancedStatusCode "5.7.1" -RejectMessageReasonText "You are not allowed to make bookings in this room" -ExceptIfFromAddressMatchesPatterns <AcceptedExternalDomain(s)>- Replace <TransportRuleName> with the desired name for the transport rule.
- Replace <RoomMailboxUPN(s)> with the room mailbox UPNs for which you want to disable anonymous bookings from external domains.
- Replace <AcceptedExternalDomain(s)> with the domain names from which you want to enable users to book the rooms.
Example:
New-TransportRule -Name "Restrict Booking Invitations for Room Mailbox" -SentTo “conferenceroom@contoso.com”, “eastroom@contoso.com” -MessageTypeMatches "Calendaring" -FromScope "NotInOrganization" -RejectMessageEnhancedStatusCode "5.7.1" -RejectMessageReasonText "You are not allowed to make bookings in this room" -ExceptIfFromAddressMatchesPatterns “fabrikam.com”, “m365scripts.com5. Grant Permissions to Room Mailbox (Exchange Admin)
Now that you have configured the room resources for external sharing and secured them to specific domains, you must now share the room calendar with the external partner so that they can view the Free/Busy information of the room. Before you can do this, you must have full permission to the room/mailbox. This next step should only be completed by the Exchange Administrator.
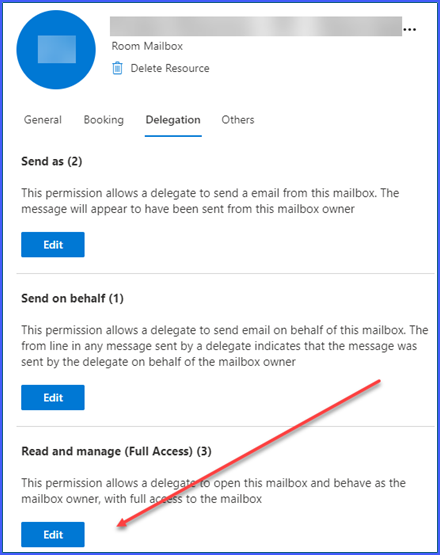
Navigate to Exchange Admin Center, Resources, search and select the room resource, then select Delegation and grant yourself permission.

6. Share Room Calendar with External Users (Free/Busy)
The final step is to log in as that room resource or mailbox and share the calendar with the external partners. The easiest way to do this is to use Outlook Web Access (OWA).
- Open OWA by navigating to https://outlook.office.com
- Select the Profile picture at the top right of the screen and then select Open another mailbox

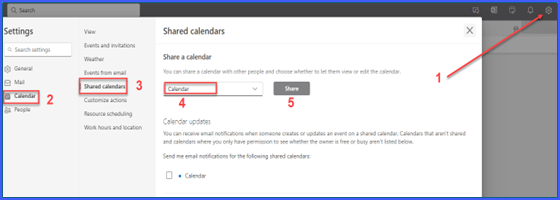
- Select Settings at the upper right of the screen, Calendar, Shared Calendars, select Calendar from the drop-down, then click the Share button

- Enter in the email address of all the external partners, vendors or consultants that you want to share the calendar with. This will allow the external users to view the Free/Busy information for the calendar.

Tip
If the room mailbox email ID is too long or difficult to remember, I suggest sending a list of all the room UPN’s and Room Names to the external partner and have them save to their contacts. This allows external users to access the room more conveniently, eliminating the need to type the entire email address of the room mailbox.
Resources
Allow External Users to Book Meeting Rooms in Microsoft 365 (m365scripts.com)

