Check Hard Disk Drive before it fails
When it comes to computers, the greatest fear is having your hard drive fail and losing all your data. Think about this for a moment. How devastated would you be if you lost all those pictures of your beautiful family or those thousands of songs you’ve spent countless hours ripping from your CD collection or downloading from the Internet or even your important financial data like your years of tax information? I haven’t even mentioned your email, novel, browser favorites, videos, homework, research, that secret cheesecake recipe, etc. It doesn’t have to be this way. Why not check your hard drive on a regular basis and take the guess work out of trying to predict when your hard drive will fail? Hmm.. check hard disk drive? Sounds too techie for me…. I’m here to tell you that it is not. Anyone can do this and best of all, it’s free!
Of course, the absolute best protection against losing your precious data is to BACK IT UP regularly. This is easy and everyone should do this. Read our post on Backing Up Your System and protect your data now. Seriously, USB hard drives are very cheap, especially when you consider the cost of losing your data to a failed hard drive. If you think your hard drive won’t fail, think again. It happens all the time. Your hard drive is like a washing machine; it works extremely hard all the time and has a lot of moving parts. Eventually, those parts get worn and fail. The only difference is that washing machine isn’t storing that adorable picture of little Susie doing her first poo-poo. So please, backup your data.
Along with backing up on a regular basis, you can also be preemptive and check the status of your hard drive. Below is our guide in helping you check your hard drive on a Microsoft Windows system. It only takes a few minutes of your time and can be the difference in keeping your data safe.
Step 1
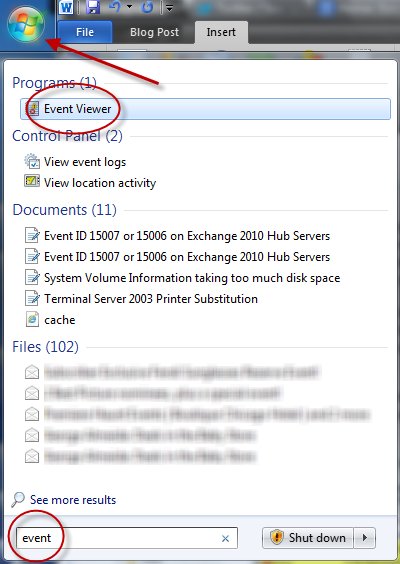
Check your event log every once in a while. The event log is where Windows stores all the messages about your computer. There are several ways to access the Event Viewer. On Windows 7, select the Start button, type Event in the Search box, then select Event Viewer. See Figure 1. For Windows 8, click the Start button, click Control Panel, click System and Security, click Administrative Tools, and then double-click Event Viewer . If you’re prompted for an administrator password or confirmation, type the password or provide confirmation.
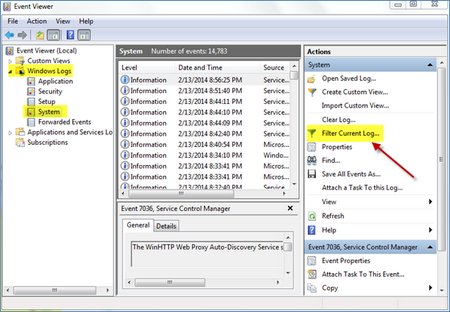
You will receive a similar screen below. On the left side of the screen, expand Windows Logs and select System. Because there are so many different messages logged, you will want to filter your view to see only Errors. Therefore, select Filter Current Log. See Figure 2.
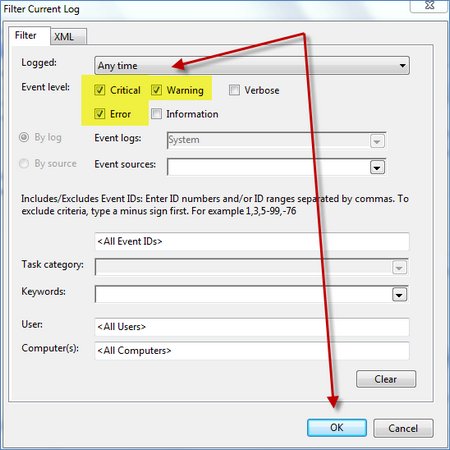
Select only the Critical, Warning and Error check boxes and then select OK. See Figure 3.
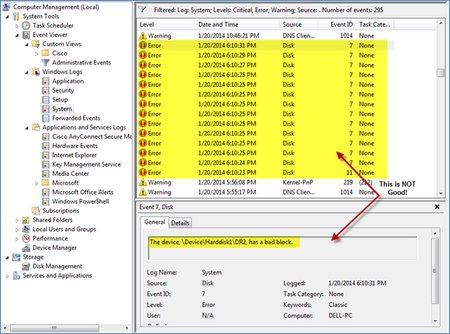
Now you should see only the important messages. Looking at Figure 4 below, you can see some disk errors. Not good. This is a warning to you that you’ve got some instability occurring on the hard drive.
Step 2
The next step is to download a very nice free utility called HD Tune. The have a Pro version that costs a few dollars but for this purpose, you only need the free one. Download the tool HERE and install it on your computer. I promise it is safe.
Step 3
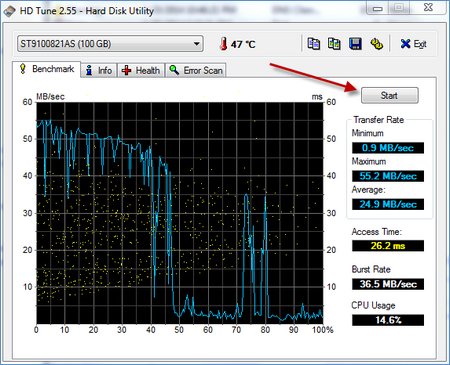
Open HD Tune, you will see a similar screen below (Figure 5). I’m not going to go into detail on what everything means, but I will touch on a few things. If you are interested in further detail, see the HD Tune Help site. If you’d like, you can benchmark your hard drive and see where it stands. Click Start to begin the benchmark.
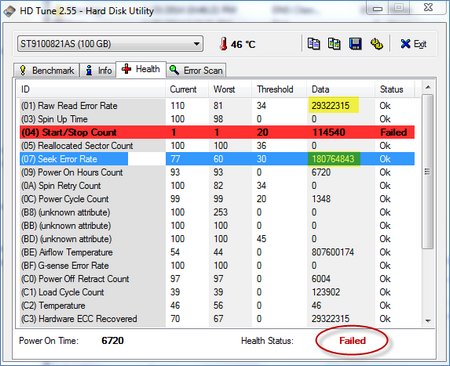
The more important tab is the Health tab (see Figure 6). In this case, you can see that this particular hard drive has a Health Status of Failed. Not what you want to see. Notice some of the highlighted information below, these are Read and Seek errors. Even though this hard drive is currently working, it is in trouble. As a matter of fact, I’m typing this blog post on the laptop with this failing hard drive. It’s a little slow and that may be an indication that this drive is taking on a little too many errors, but I’m not worried. Do you know why? Cause I backed up my data. However, if I want to continue using this laptop, then I’ll eventually replace the hard drive.
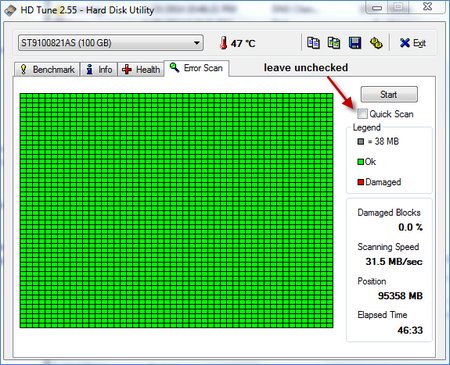
The other tab that I like is the Error Scan tab (Figure 7). I recommend selecting this tab and running the scan. Make sure to uncheck the Quick Scan checkbox before pressing Start so that it performs a detailed scan. This will take a few minutes so go grab a cup of coffee. Speaking of coffee, we bought a Keurig Coffee Maker this past Christmas and we are hooked! If you love coffee, this machine will change your life. OK, that’s a bit dramatic, but seriously, it makes awesome cups of coffee every time! But I digress.
As you can see, the scan found no damaged blocks so I’m not too worried but I also won’t be too surprised when this hard drive eventually fails……and it will.
I hope this helps someone prevent that agonizing realization of losing years of pictures, music, files and memories. If you like this, please give us a Like on Facebook or better yet, leave a comment. If you think a blog post on “How to Buy a Hard Drive for Your Computer” would be beneficial, let me know. I think I can whip something up pretty quick.

