How to configure wireless to work in Ubuntu
I’m a Windows guy. My entire career has been working with Windows desktop operating systems going all the way to Windows 3.1 and even MS DOS. My first server operating system was Windows NT 4.0. So why am I writing about how to configure wireless in Ubuntu? Curiosity mostly, but also because it is completely 100% free. This is remarkable to me because this operating system is very robust and feature rich. The folks responsible for creating and maintaining it are truly geniuses. I can see why this OS has been a favorite of techies everywhere, especially anti-Microsoft folks (can you say Linux fans). I have no problem with Linux, specifically the Ubuntu flavor. I am by no means, a Linux guru. I’m the farthest thing from it which is why I’m writing this blog.
I had an old x32 Dell Precision M90 laptop with 2GB RAM and a 100GB HD laying around and I was bored. I had already loaded a copy of Windows 7 on it and it ran surprisingly OK. It is a little sluggish of course, but that is to be expected. I knew that the latest version of Ubuntu 13.10 had just been released, so I thought I’d build this laptop to dual-boot to W7 and Ubuntu. Downloading and installing Ubuntu 13.10 and configuring the laptop to dual boot was a snap thanks to the Ubuntu Live CD installation. It does everything for you. It is easier if you already have Windows installed first, then install Ubuntu second. The installation process will even resize the disk partition for you and configure the grub boot loader automatically. That was the easy part. The hard part was getting the Ubuntu OS to recognize my wireless card on my Dell.
As I stated earlier, I work with computers for a living, so I’m technically competent but I sure didn’t feel that way trying to get Ubuntu to recognize the wireless card on the Dell M90. Before I lay out the steps I used to get this finally working, let me state that there is a lot of Ubuntu information out there and lots of great forums. I’ve been very impressed with Linux community and their amount of knowledge and willingness to help newbies learn the Linux OS such as myself. Thank you!
1. Connect the laptop to a wired Internet connection
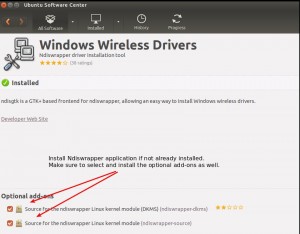
2. Open the Ubuntu Software Center and search for ndiswrapper. Ndiswrapper is a Linux module which allows Ubuntu to use the Windows driver for wireless cards. Install it if you do not already have it installed. Please make sure to install all the add-ons as well.
3. To find the the Chipset that the Dell Precision M90 used, open a Terminal Session by selecting the Search![]() button and typing in terminal.
button and typing in terminal.
Type in the following command to display your wireless card model.
lspci – vvnn
You should notice the information below. In this case, the wireless card is the second entry (BCM4311 802.11b/g WLAN).
09:00.0 Ethernet controller: Broadcom Corporation NetXtreme BCM5752 Gigabit Ethernet PCI Express (rev 02)
0c:00.0 Network controller: Broadcom Corporation BCM4311 802.11b/g WLAN (rev 01)
4. Download the Windows driver for the Broadcom BCM4311 from the Dell website. Rule of thumb, use the driver for the OS that originally came with the laptop. In my case, this laptop came with Windows XP even though I have Windows 7 loaded now. Place the downloaded file on the hard drive somewhere and extract it.
5. Install the Ndisgtk package. This is a graphical interface to the ndiswrapper which will allow you to install the wireless driver easily. Make sure you have an Internet connection and type in the following command in a Terminal session
sudu apt-get install ndisgtk
6. Open Ndisgtk by selecting Search button and typing ndis. You will notice the Windows Wireless Drivers application. Open it.
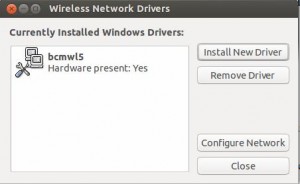
7. Select Install New Driver and then navigate to the folder where you extracted your Windows wireless drivers. Look for the .INF file. Select it and install it.
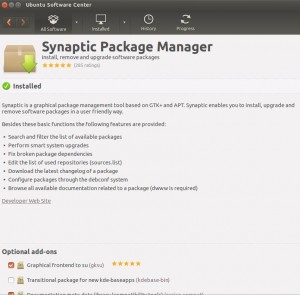
8. Reboot the laptop and see if your wireless card is recognized and connects. If not, you may have a conflict with the “free” driver that may have come built into the Ubuntu 13.10 installation. This was my problem. My wireless connection would sometimes connect and sometimes not connect. It was like pulling teeth to connect every time I shut down the computer or rebooted it. I found a great post on Ubuntu.com describing how this built-in driver can cause a conflict with ndiswrapper. So I uninstalled it using Synaptic Package Manager. If you do not have SPM, then you need to install it by opening the Ubuntu Software Center and search for Synaptic Package Manager. SPM is a graphical application manager that allows graphical-minded people such as myself, install and uninstall Ubuntu packages without having to use the command line (terminal session).
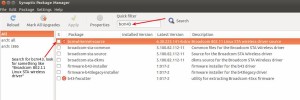
9. Once Synaptic Package Manger is installed, open it. Search for “bcm43” and find the STA wireless driver. Right-click the driver and select “Mark for Removal” and then Apply.
10. Reboot your laptop and connect to your wireless network.
These steps worked for me. Unfortunately, it took me a while to get things stabilized and figure out what was wrong. Everything works great now. All this information can be found on the web but there are various locations. I thought it might help others by putting this information in one document for those of us who are newbies to Linux and Ubuntu. Hope this helps someone. If so, leave a comment!
References
www.ubuntu.com
www.askubuntu.com
www.ubuntuforums.org



Did you ever get bluetooth to work? 😉
Yes Matt, I did get bluetooth working. I didn’t have to do anything special for that to work.